Author Topic: Stop.... It's hammer time: New power hammer!  (Read 54925 times)

0 Members and 3 Guests are viewing this topic.

Offline Twilight Fenrir

  • Hero Member
  • *****
  • Posts: 547
Stop.... It's hammer time: New power hammer!
« on: August 04, 2016, 08:48:52 PM »
Well, just got back from an 8 hour trip down to Minneapolis to pick up the newest addition to my blacksmith shop... my first power hammer, a Mayer Bro's Easy-Helve. It's a bit of an odd duck, but there's a bunch of history behind them, and I just love it to pieces... which is a good thing, because it's in pieces, haha.

So, the Mayers Bro's is the company that made the Little Giant originally. They started making these helve hammers in 1902 while they had the patents pending on the machine. Ultimately, the company got sued for patent infringement on the helve and was driven into the ground, only manufacturing 395 of these hammers. The company would rise from the ashes as The Little Giant Company, and of course become enormously popular.

It will take a little bit of work to get it up and running, but someone already got about 3/4 of the way through restoring it, I basically just have to put it together, get/make new dies, get/make new clutch blocks and invent a drive system. I've got a 1-1/2hp electric motor I was saving for my 30" bandsaw, but I'm probably going to sell that machine, and keep the motor for my helve. Will have to do something about the red paint on the motor though... >_>

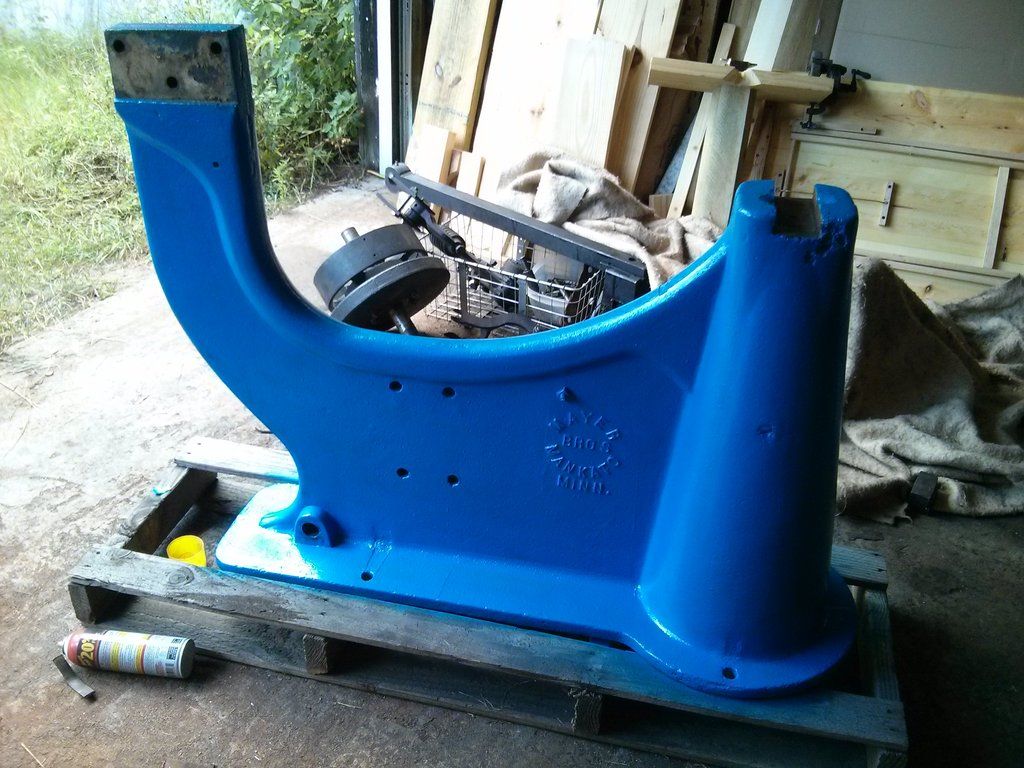
This is how she looks at the moment...


And this is what a restored machine looks like:


Offline blackoak

  • Sr. Member
  • ****
  • Posts: 101
Re: Stop.... It's hammer time: New power hammer!
« Reply #1 on: August 05, 2016, 12:57:35 AM »
Very nice!!
 Several years ago a local coal mine that I did contract work at shut down. It was one of the longest active mine in Indiana when it shut down. It had a what the old guy's called the blacksmith shop. There was a trip hammer in that building that was huge. I don't remember much about it, but I was told it had been there way before MSHA's rules and regulations. MSHA shut it down after an inspection for safety reasons I was told. Like I said it was huge and it did look pretty dangerous . It had to weigh several tons I would have thought. It stood a lot taller than me at 6 feet. They said when it was ran you could feel the ground shake a long ways and hear it for  miles. When the mine shut down they tore the building down and cut it up for scrap. There's no telling what it would have been worth to the right person.

Offline oldgoaly

  • Hero Member
  • *****
  • Posts: 1489
Re: Stop.... It's hammer time: New power hammer!
« Reply #2 on: August 05, 2016, 02:56:53 AM »
cool!
A bunch of pics (5000+) of tools and projects in our shoppe
https://www.facebook.com/187845251266156/photos/?tab=albums

Offline Yadda

  • Hero Member
  • *****
  • Posts: 1950
Re: Stop.... It's hammer time: New power hammer!
« Reply #3 on: August 05, 2016, 05:32:56 AM »
You might say I have a tool collecting problem....

Offline lazyassforge

  • Sr. Member
  • ****
  • Posts: 176
Re: Stop.... It's hammer time: New power hammer!
« Reply #4 on: August 05, 2016, 08:07:54 AM »
It looks like you got a pretty good hammer!

 Looks like the parts are in good shape. How are the Babbitt bearings and the babbit  in the clutch? Does it have the wood clutch blocks or the cone type clutch?

Bill D

Offline Twilight Fenrir

  • Hero Member
  • *****
  • Posts: 547
Re: Stop.... It's hammer time: New power hammer!
« Reply #5 on: August 05, 2016, 09:09:15 AM »
It looks like you got a pretty good hammer!

 Looks like the parts are in good shape. How are the Babbitt bearings and the babbit  in the clutch? Does it have the wood clutch blocks or the cone type clutch?

Bill D
Yep :) The only included part  I'm concerned about is where these pins were welded to the plates... Odds are, I'm going to have to grind those off and make new pins to go into there, but I'm a bit worried about what the steel under those sloppy welds might look like...


The babbit bearings are great, there's plenty of babbit in them, so there's no need to repour them. Just need to shim the blocks, and it should be good to go. Someone tapped all the oil holes for grease fittings. Which I've been doing a little bit of research into, a lot of purists say grease is bad for babbit bearings, but from what I can find it appears to depend upon the RPMs at play. Grease is fine at lower RPMs, but high RPMs need to stick with oil. Research tells me this machine should spin about 325 RPM, which is comparatively low...

It has the wood block clutch type. I've been trying to find more information about this, apparently the originals were made out of maple. Has anyone seen a rough pattern out there for making new ones? Should be the same as the Little Giants. Mine are pretty worn down, and I'll need to make some before putting it into service.

My biggest concern at the moment is the dies... I have a friend who can  probably help me make some, but I was secretly hoping I could just buy a set, but all the hammer dies I see for more popular machines are $400+ o_o

Offline turnnut

  • Hero Member
  • *****
  • Posts: 1861
Re: Stop.... It's hammer time: New power hammer!
« Reply #6 on: August 05, 2016, 09:45:52 AM »
 have you thought about synthetic oil ?   like Amsoil ?

Offline lazyassforge

  • Sr. Member
  • ****
  • Posts: 176
Re: Stop.... It's hammer time: New power hammer!
« Reply #7 on: August 05, 2016, 10:23:17 AM »
Twighlight,

On the links, they look like they are just made from flat stock. If so,I would probably just cut new pieces and drill the correct size holes in them. I would buy some long bolts with the in threaded portion the appropriate length and either retain them with nylock nuts and cut off excess threads or get bolts with longer unthreaded shanks and cut off threads and drill holes for cotter pins.

Concerning the lubrications. There are a lot of thoughts on this. In my opinion, grease is fine on babbit IN A CLEAN ENVIROMENT. In a blacksmith shop it collects and holds grit and pieces of scale. Some will say use chainsaw bar oil because it sticks to where you put it. I feel thirty weight non detergent oil is good. It will flow into the bearings and the excess will sling off taking the grit and scale with it this cutting down on wear. It will also sling oil all over the shop unfortunately!

There is probably a fitting at the end of the shaft. This lubricates the clutch bearing. I do not put grease in there, I oil the shaft from the outside because grease tends to make the clutch run on because of its thickness pulling on the bearing.

That is my opinion for what it's worth!

Hope this helps, Bill D

Offline Twilight Fenrir

  • Hero Member
  • *****
  • Posts: 547
Re: Stop.... It's hammer time: New power hammer!
« Reply #8 on: August 05, 2016, 05:16:54 PM »
Twighlight,

On the links, they look like they are just made from flat stock. If so,I would probably just cut new pieces and drill the correct size holes in them. I would buy some long bolts with the in threaded portion the appropriate length and either retain them with nylock nuts and cut off excess threads or get bolts with longer unthreaded shanks and cut off threads and drill holes for cotter pins.

Concerning the lubrications. There are a lot of thoughts on this. In my opinion, grease is fine on babbit IN A CLEAN ENVIROMENT. In a blacksmith shop it collects and holds grit and pieces of scale. Some will say use chainsaw bar oil because it sticks to where you put it. I feel thirty weight non detergent oil is good. It will flow into the bearings and the excess will sling off taking the grit and scale with it this cutting down on wear. It will also sling oil all over the shop unfortunately!

There is probably a fitting at the end of the shaft. This lubricates the clutch bearing. I do not put grease in there, I oil the shaft from the outside because grease tends to make the clutch run on because of its thickness pulling on the bearing.

That is my opinion for what it's worth!

Hope this helps, Bill D
Yeah, replacing that link is probably the best idea. Though, the person who did the welding seems to have replaced it once already. Actually, all the flat stock pieces appear to be brand new, which is great, no wear there. The other link is held together with some hand-forged pins with cotter pins to retain them, and I quite like the look of that...

That's an excellent point about the grease retaining grit... My first thought was, "Well, how's grit gonna get into there if I shim it properly..." but, that's exactly how it would, because there will be a space between the top and bottom bearings, and stuff will get in there. I've been using 75W "Gear Oil" for manual transmissions in my behemothic post-mount drill press, I'll probably do the same for the hammer... because I have a ton of it >_> And, it seems to work well. I'm mildly concerned about some pitting on the main shaft, I doubt it's severe enough to cause any issues, but still, it's there, and I'm easily concerned :P

Yes, the clutch definitely needs to be oiled, this I know!

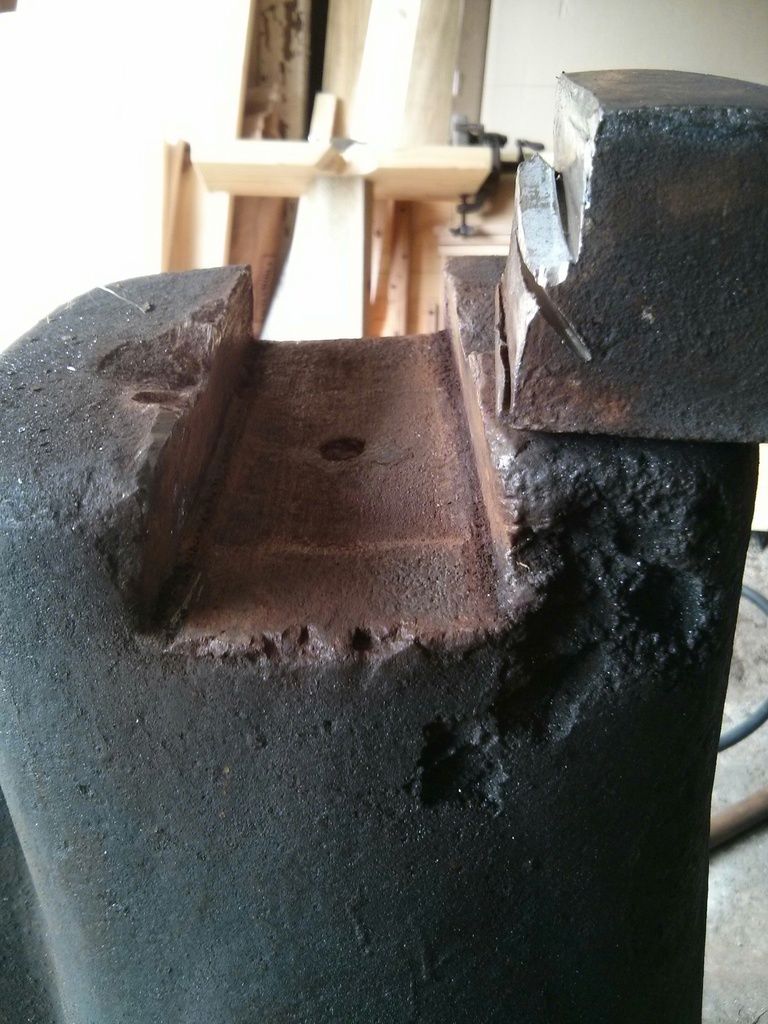
I spent the better part of today fiddling with the hammer, I had to CUT the lower die out, and it took FOREVER XD A cutting torch would have made things go much more quickly, but I don't trust myself enough to risk damaging the cast iron frame in the name of expedience. It's a shame, though, I was hoping to keep the bottom die for a spare top die. But there was absolutely no way the die was going to come out any other way. The shims just deformed and made themselves even more impossible to be driven...

Also, the hammer is now blue! All the rest of the bits will stay the matte black they were painted by the previous restorer, I think it will look really sharp.


Offline Nolatoolguy

  • Hero Member
  • *****
  • Posts: 2059
Re: Stop.... It's hammer time: New power hammer!
« Reply #9 on: August 05, 2016, 06:58:33 PM »
Looks like a very good start, with many future pieces to be made on it.

I to would be concerned with the steel under those welds an pins. I would at least grind out the old bubble gum welds an make sure it gets properly done. at that point thoe it may be easier just to replace the whole piece. With the pressure from the spring an constant motion hammer I wouldn't trust it.

It's a relatively easy piece to make, if you have the right tools.

It's a great piece thoe. Please keep us updated :)
And I'm proud to be an American,
where at least I know I'm free.
And I won't forget the men who died,
who gave that right to me.
~Lee Greenwood

Offline Nolatoolguy

  • Hero Member
  • *****
  • Posts: 2059
Re: Stop.... It's hammer time: New power hammer!
« Reply #10 on: August 05, 2016, 07:06:22 PM »
As far as getting the old dies out a torch would be risky unless you pre and post heat. Even then it's still old cast. Lots of times cast iron is a tricky metal to weld/cut. Heat in affected area can cause it to crack or weaken.

It can be done but you have to be careful. I can do it but it still scares me after many times I messed stuff up.

And I'm proud to be an American,
where at least I know I'm free.
And I won't forget the men who died,
who gave that right to me.
~Lee Greenwood

Offline lazyassforge

  • Sr. Member
  • ****
  • Posts: 176
Re: Stop.... It's hammer time: New power hammer!
« Reply #11 on: August 05, 2016, 07:42:58 PM »
I'm not sure but I would guess that the clutch blocks would be the same as a twenty five pound little giant. You might give them a call at little giant in Nebraska. They should know. If you have your serial number off the machine, they can tell you who it was shipped to from the factory and when it was shipped. I always found that interesting! I think the blocks are about forty bucks for a twenty five pound hammer. If the old blocks can be shimmed out even if the mounting holes have to be re drilled, I would keep the old ones because they are oil soaked and humidity does not affect them. It takes quite a while for new blocks to get enough oil in them so the humidity doesn't change the clutch operation.

Bill D

Offline oldgoaly

  • Hero Member
  • *****
  • Posts: 1489
Re: Stop.... It's hammer time: New power hammer!
« Reply #12 on: August 05, 2016, 07:57:31 PM »
The hardest thing i had to do was cut the upper die out of the die holder, a air arc might have helped.
For some reason the upper die was welded better than the lower? not a good pic it's hardly noticeable
50# Mayer Bros. Sid Sudemeier is the GUY!   Somewhere there is or was a nice Easy rebuild in pics.
You probably know this page well http://www.littlegianthammer.com/
« Last Edit: August 05, 2016, 08:01:20 PM by oldgoaly »
A bunch of pics (5000+) of tools and projects in our shoppe
https://www.facebook.com/187845251266156/photos/?tab=albums

Offline Twilight Fenrir

  • Hero Member
  • *****
  • Posts: 547
Re: Stop.... It's hammer time: New power hammer!
« Reply #13 on: August 05, 2016, 08:08:20 PM »
Looks like a very good start, with many future pieces to be made on it.

I to would be concerned with the steel under those welds an pins. I would at least grind out the old bubble gum welds an make sure it gets properly done. at that point thoe it may be easier just to replace the whole piece. With the pressure from the spring an constant motion hammer I wouldn't trust it.

It's a relatively easy piece to make, if you have the right tools.

It's a great piece thoe. Please keep us updated :)

In all sincerity, totally not being sardonic... how do you even get welds that ugly? I'm a pretty terrible arc welder, and I've never seen anything look like that come out the end of my stick. What causes.... THAT?

As far as getting the old dies out a torch would be risky unless you pre and post heat. Even then it's still old cast. Lots of times cast iron is a tricky metal to weld/cut. Heat in affected area can cause it to crack or weaken.

It can be done but you have to be careful. I can do it but it still scares me after many times I messed stuff up.
Well, I wouldn't have been cutting the cast, I would have been cutting the die, but that's exactly my concern. I know cast tends to crack if it gets hot, and cools too quickly, so I wasn't going to try to heat it and beat it either. A cutting wheel in my angle grinder worked, it just took a looong time with that hard, hard steel. Even when I cut 3/4 of the way through the shim, the shim STILL wouldn't budge... just awful.

I'm not sure but I would guess that the clutch blocks would be the same as a twenty five pound little giant. You might give them a call at little giant in Nebraska. They should know. If you have your serial number off the machine, they can tell you who it was shipped to from the factory and when it was shipped. I always found that interesting! I think the blocks are about forty bucks for a twenty five pound hammer. If the old blocks can be shimmed out even if the mounting holes have to be re drilled, I would keep the old ones because they are oil soaked and humidity does not affect them. It takes quite a while for new blocks to get enough oil in them so the humidity doesn't change the clutch operation.

Bill D
I didn't even think about shimming out the blocks! That's brilliant! :D I can just slip some 1/4" or... whatever it looks like it needs stock behind the blocks, move the holes, and call it good! Thank you Lando Calrisian! (Who was played by Billy D. Williams :P) Also, yes, it does use the same clutch blocks as the 25lb Little Giant, as well as several other parts. I wasn't aware new blocks could be purchased, $40 for some finished blocks is very reasonable, so maybe I'll order up a pair to keep on hand for when these ones are completely gone.
« Last Edit: August 05, 2016, 08:12:13 PM by Twilight Fenrir »

Offline lazyassforge

  • Sr. Member
  • ****
  • Posts: 176
Re: Stop.... It's hammer time: New power hammer!
« Reply #14 on: August 05, 2016, 08:42:50 PM »
Ferrier,

I would not be concerned about wearing out the clutch blocks, on my hammers that have blocks have not worn noticeably in quite a few years and once I got them adjusted the first time, the only one I have adjusted has been the one I put new blocks in and I finally decided it was changing with the humidity. I used a vacuum pump hooked to a jar with the blocks and an oil/diesel mixture in it and cycled between vacuum and atmospheric pressure until they quit bubbling(similar to stabilizing wood for knife handles but with oil). This seems to have evened out the clutch. You mentioned being concerned about pitts in the shaft. Just think about them as being oil retention spots!!! These machines were made with very liberal tolerances and most have been butchered pretty bad over the years! Look in the blacksmith section here on tool talk and look for the 25pound rebuild ( http://www.papawswrench.com/vboard/index.php?topic=362.0 ) to see some more of the "bubblegum" welds!

Bill D
« Last Edit: August 05, 2016, 09:03:02 PM by lazyassforge »